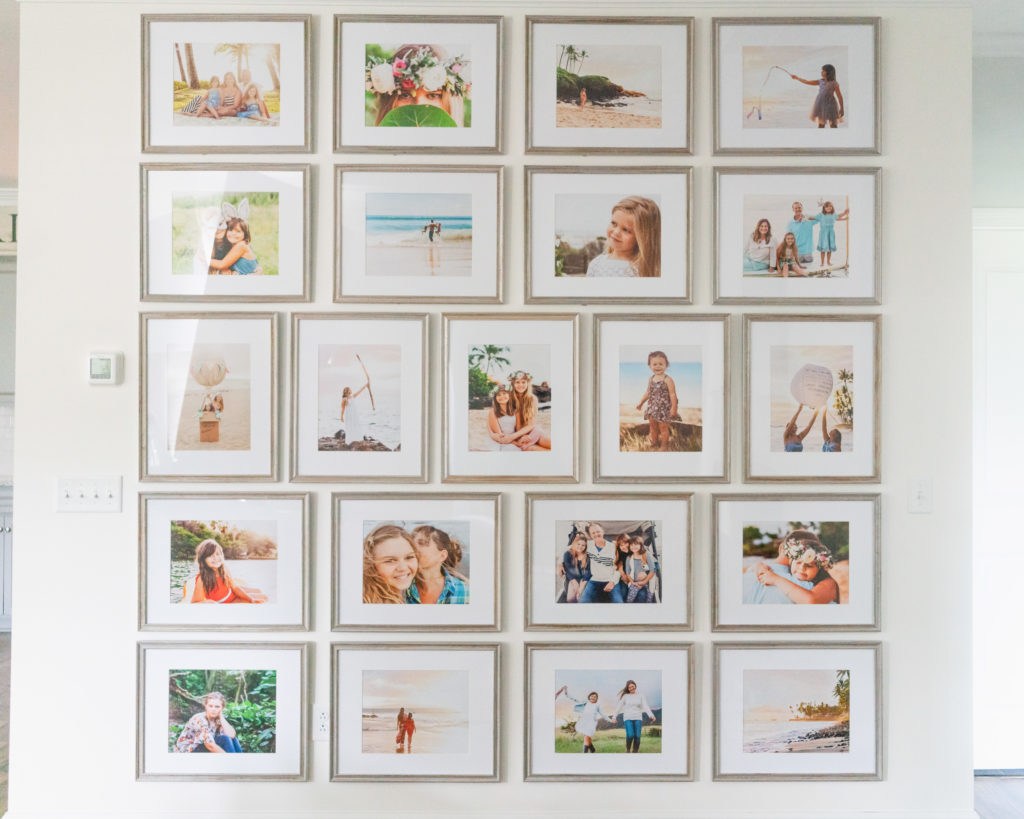
A few months after we moved from Maui to our home in South Carolina, I was staring at a large blank wall in our living room/great room and decided a floor to ceiling gallery wall would be perfect there. But here’s the thing, almost everything I’ve ever hung up, I’ve eyeballed. And while I do pretty well at that, I knew I could not do that for this project. I also had 16 years of photographs of my family to go through and decide on just a few favorites. Also, I wanted this to work for a few portrait orientation (vertical) photographs and also landscape (horizontal) orientation. Finally, I did utilize software software I have that creates wall art designs for my clients. But there are ways to do this without software too.
I’m breaking down the process for you here, with steps that you can follow without being a professional photographer.
- Decide on your wall. You want one where this story wall is a focal point. You also want to not have too much direct sunlight because the sun’s light will damage the photographs over time. And entry wall, living room/family room wall, or a wider hallway work well. If you have a larger open space, think about it there because it will make it feel more meaningful and cozy.
- Spend the money on the paper quality, and if you need to save money do it with DIY framing.
- Decide on a frame that is neutral for your photographs and matches the aesthetic and design of your home. I waited for a sale at Michael’s. Hobby Lobby is also a good resource. All of my frames are the exact same. Some frames did come damaged or with the wrong frame, so you may want to order a few extra if returns aren’t too difficult for you to be able to do.
- Choose your photographs so that your wall will tell your story. I did have to let go of a few favorites to put elsewhere. That said I chose what mattered and the different ages and stages, different places we’ve been, and a mix of individual, mom + child, dad + child, and family moments.
- Choose the placement of the photographs in the grid. You can print smaller prints to do this at home (recommended) or do it on your computer. Each row had at least one family grouping. Then I went to individuals, and sprinkled in groupings as needed. I also looked at direction the subject was facing. (If facing towards the left, they were on the right, and vice versa.) Finally, I made sure the colors were balanced. Most of my photographs had blues in them and I staggered those as well.
- Decide on printing in color or black and white. (If black and white it will not only be timeless, but easier to group because you won’t have to factor in color.) If printing professional photographs, if possible, print through your photographer. If you are printing your own through a consumer lab utilize one online.
- Decide on sizing and make sure you can see the story. I used 16×20 frames and 11×14 photograph prints. I would not go smaller than 11×14 frames with 8×10 prints. I highly recommend using mats because it will help your story wall “read better.”
- Use a calculator and measuring tape to get your measurements right. Use a level too. To make a template, use butcher paper when nailing in picture hanging hooks.
- Take your time, measure twice if needed. And holes in walls can always be repaired.
- Use a level as you hang the photo frames to keep everything, well, level. I had a small 8″ one and also a 2.5′ one. The larger made sure I was level between frames, and the smaller for the frame itself.